RE-ENLISTMENT PROCESS
This procedure is established to standardize the re-enlistment sub-process on the AIRbnb and Guesty platforms. It covers the validation of the existence of already published listings, the retrieval of information stored in GUESTY, and its proper placement and activation on AIRbnb.
Objectives
· Explain the re-enlistment process through the AIRbnb and Guesty platforms.
· Keep the units visible to increase the number of bookings on the platform.
· Standardize the setup features and information in the listings on the platforms.
· Ensure the correct setup of the listings on the platforms.
The follow-p for this task is stored in a shared cloud folder: https://docs.google.com/spreadsheets/d/1d-R9EgT8JKyLz9h-DZRI0Pd9ROQqKJ6oImhLCu3Ve7g/edit?gid=478823239#gid=478823239
FAQ's
Profiles and inputs for the execution of the processes established in this document.
Envirotek:envirotek@user.guesty.com
Valerio2022*Paola:wehostpaola@user.guesty.com
Wehost2022Info:WEHOSTINFO@USER.GUESTY.COM
Wehost2022*Washington:wehost.dc1@user.guesty.com
Whost2024$$wehost.dc2@user.guesty.com
Valerio2023##Johana:wehostjohana@user.guesty.com
Wehost2020Miami Reservations:wehost.miamireservations@user.guesty.com
Valerio23#Hello:wehosthello@user.guesty.com
Valerio2022***Contact:wehostcontact@user.guesty.com
Valerio2023$$ (edited)
Workflow Map
Producer Line
Procedure 1: Review of the unit to be worked on
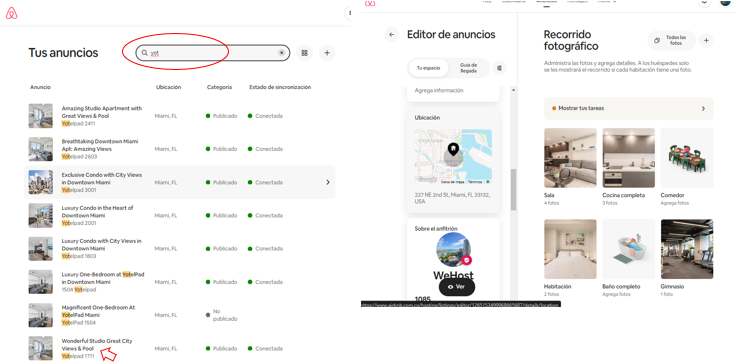
To begin, it is important to work based on the order established in the Excel Listing in DRIVE. This ensures that we are aware of the urgent units to be re-enlisted and those being handled by other agents.
Excel Listing in DRIVE: https://docs.google.com/spreadsheets/d/1d-R9EgT8JKyLz9h-DZRI0Pd9ROQqKJ6oImhLCu3Ve7g/edit?gid=478823239#gid=478823239

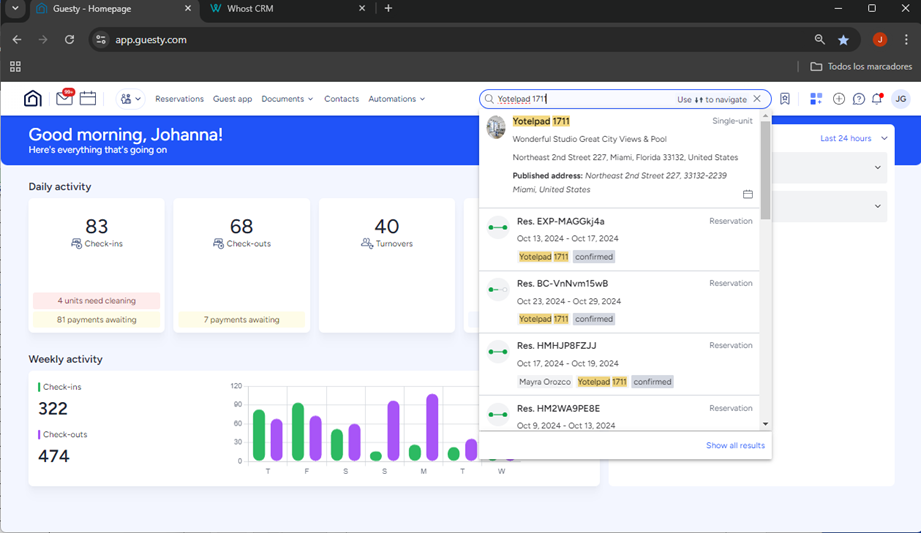
1.1 After identifying the unit to work on, we search for the listing in Guesty.
It's important to remember that this platform serves as the information base.
1.2. Open AIRbnb
Login:
WEHOSTINFO@USER.GUESTY.COM
Password: Wehost2022*"
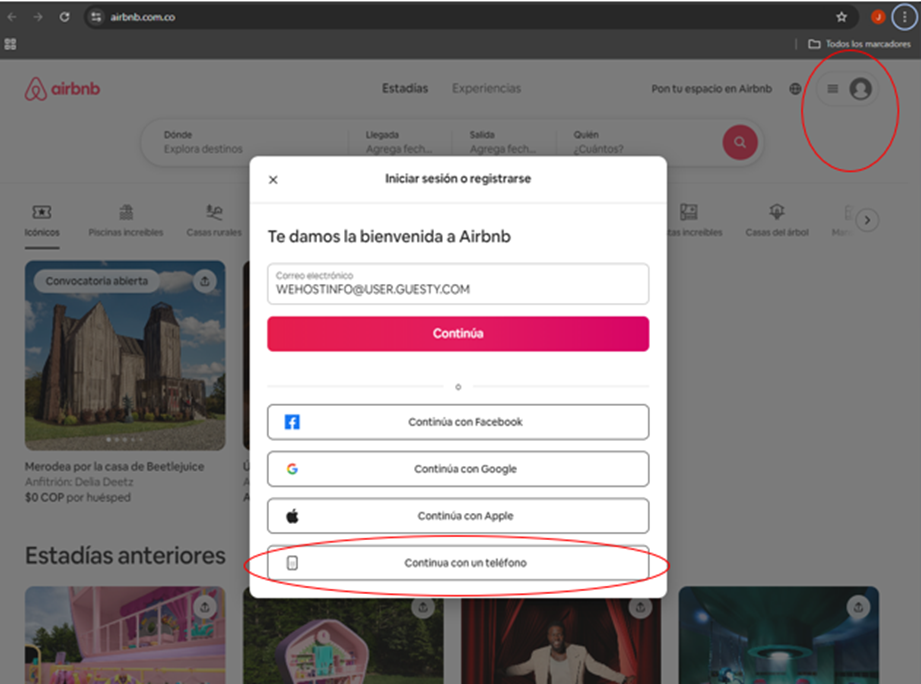
1.3. Open another platform to begin the process:
https://www.airbnb.com.co/
AIRbnb / Host mode
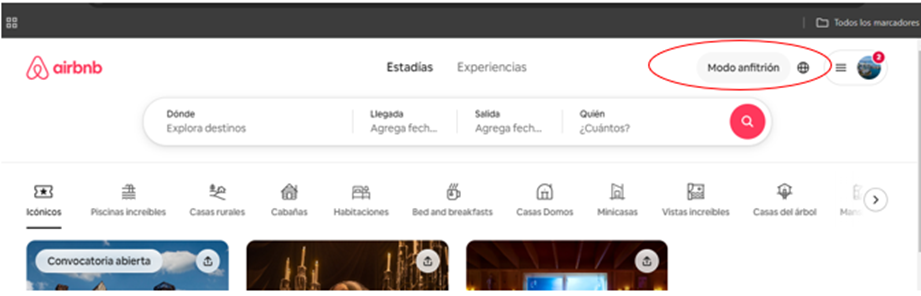
Procedure 2: Creation of a New AIRbnb Listing
https://www.airbnb.com.co/
AIRbnb /Host mode
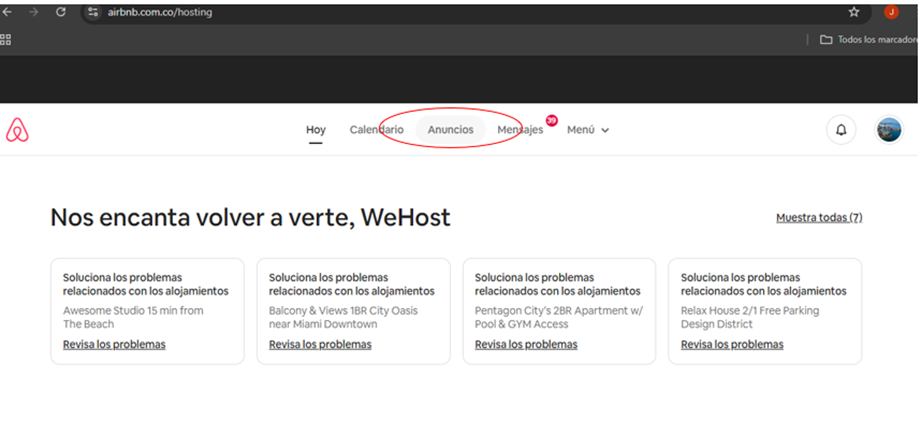
2.1. Host mode / Listings / Search with the unit number
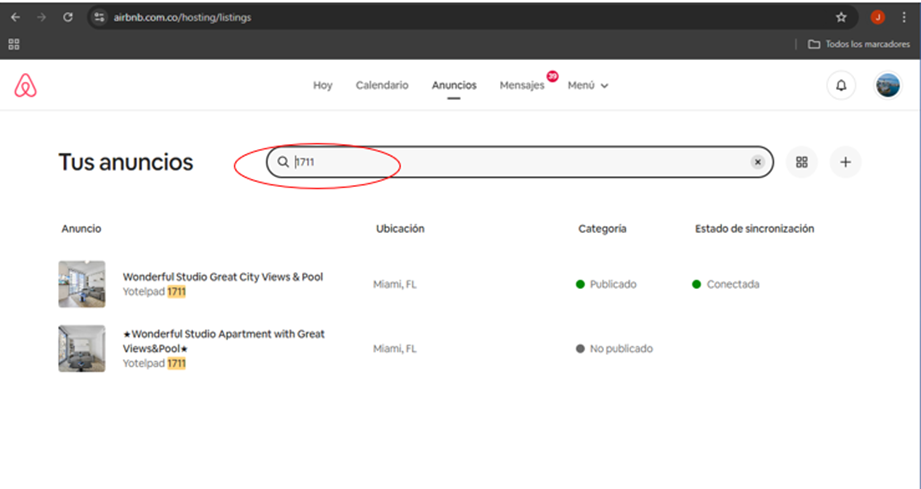
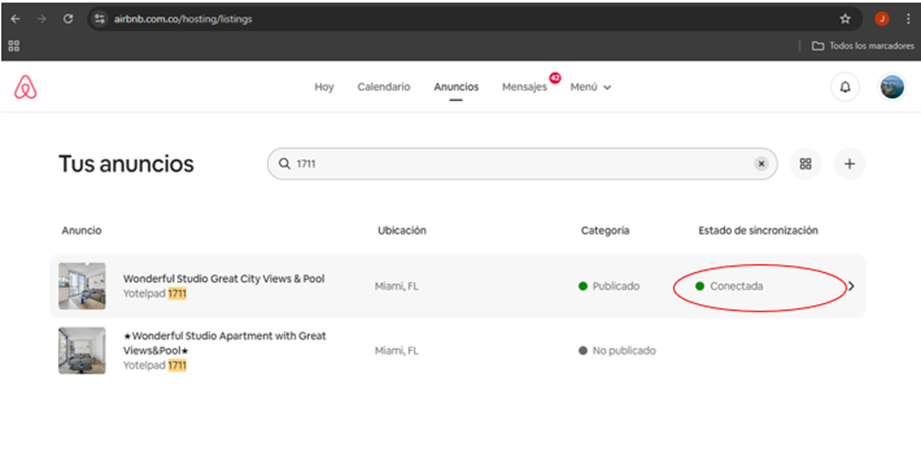
2.2. Select the unit that is connected to Guesty
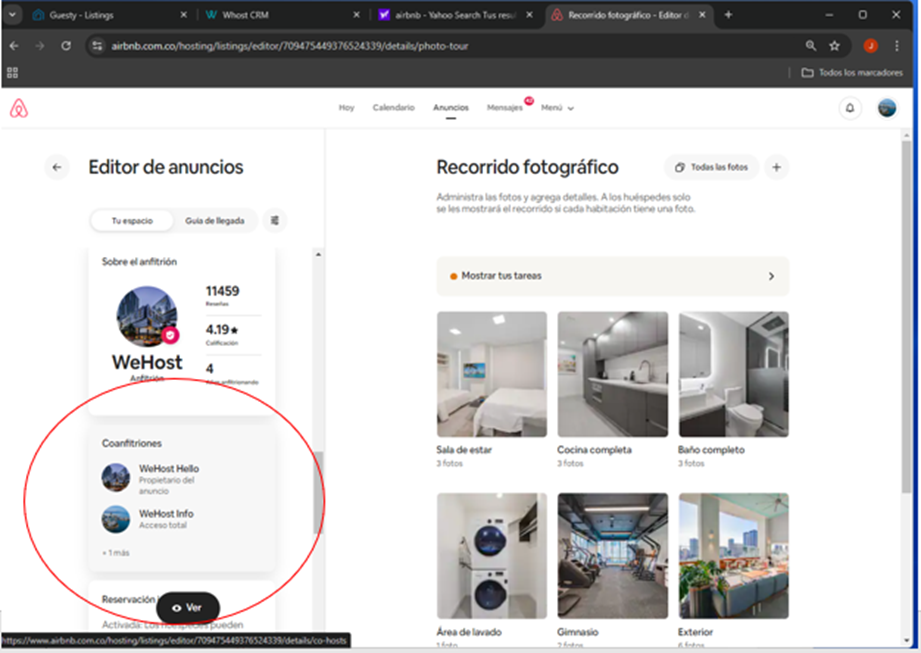
2.3. Scroll down in the left column to 'Co-hosts.'
Here, you can identify which profile uploaded the listing.
2.4. New listings should be created under the highest-ranked profiles.
Miami: Miami Reservation (Luxury)
INFO (for Liberty houses, e.g.)
DC: DC1
Note: A Luxury property is identified by its location and layout.
2.5. To create a NEW LISTING, use the previously mentioned profile.
In this case, you should open AIRbnb with the Miami Reservation user.
Repeat step 3 or CREATE.

IMPORTANT: Keep in mind that when creating the listing, it should be set to hidden.
Procedure 3. Listing Features Process
This is how the listing appears, depending on its status: Published or Not Published.
When making changes, it must be set to Not Published.

3.1. Start process in Arrival Guide
3.2. Always set check-in at 4:00 PM and check-out at 11:00 AM.

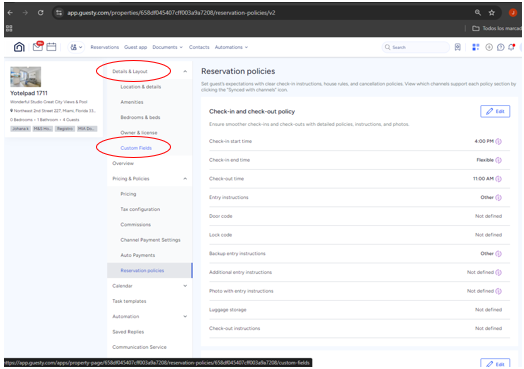
3.3. To set the Check-In Method, the unit must be verified.
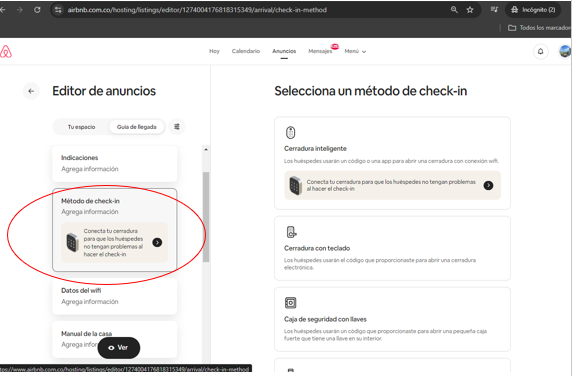
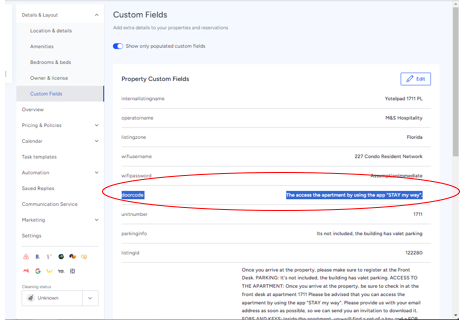
3.4. The unit must be verified: Guesty / Custom fields.
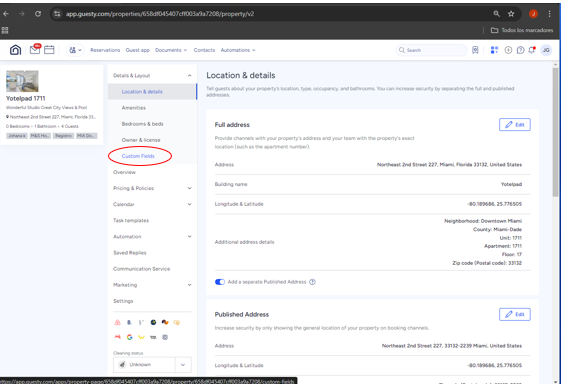
3.5. The unit must be verified: Guesty / Custom fields.
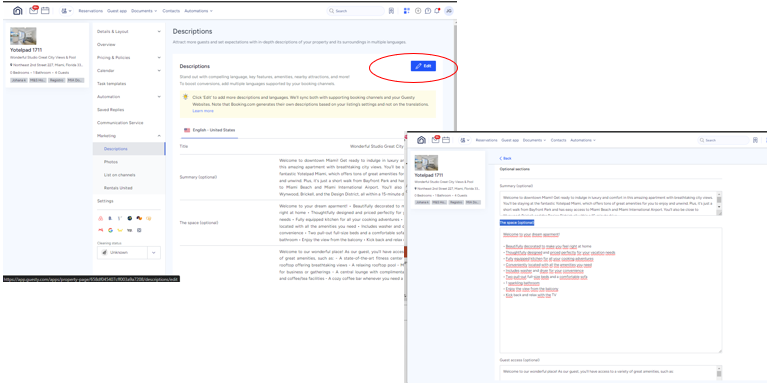
3.6. The description must be extracted from Guesty to include it in Airbnb as additional information for the guest.

IMPORTANT: 3.7. WiFi information should not be added because the platform blocks it
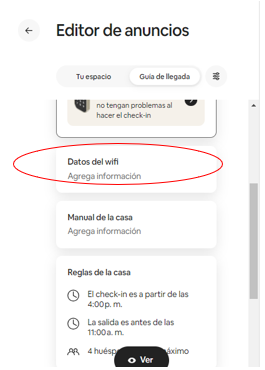
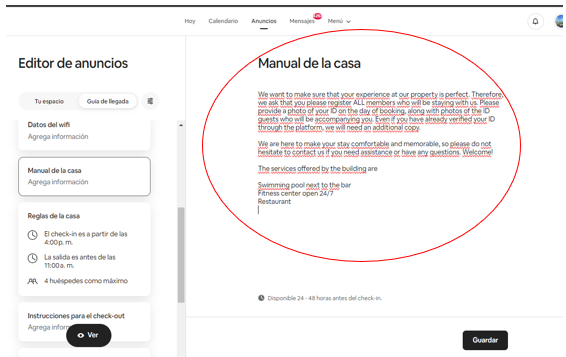
3.8. For the House Manual, information is taken from Guesty / Location and details.
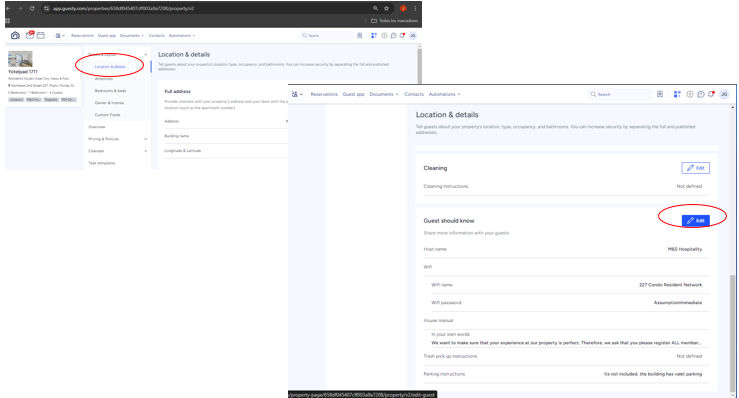
3.9. Guesty/ Guest should know/ EDITAR
Copy the text HOUSE MANUAL

3.10. Guesty/ Guest should know/ EDITAR
Copy the text HOUSE MANUAL into AIRbnb
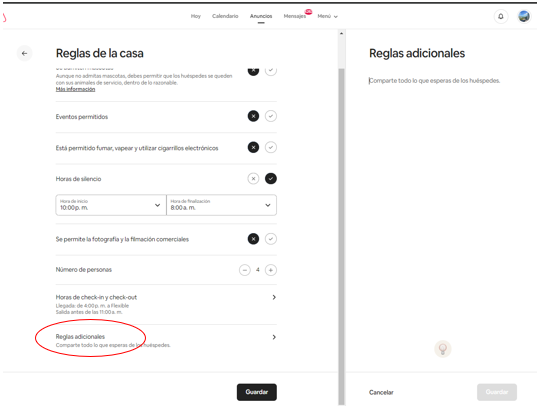
3.11. House Rules

House rules: Generally, this information is located as follows:
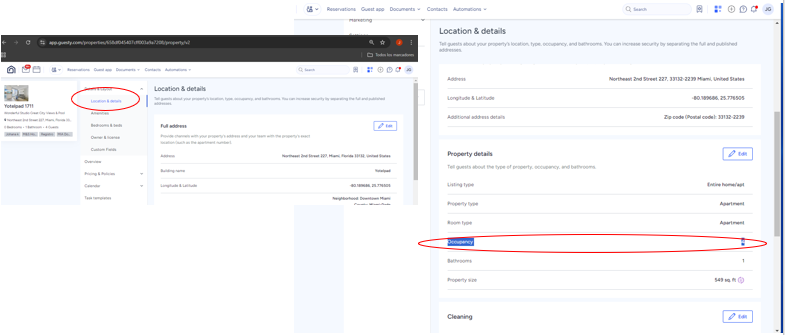
For the number of people: Guesty / Location and details / Property details / Occupancy
And put the number in AIR.
The Additional Rules are taken from Guesty.
3.12. Guesty / Select Pricing & Policies / Reservation Policies.

3.12.1. Guesty / Select Pricing & Policies / Reservation Policies
// House Rules / Edit.
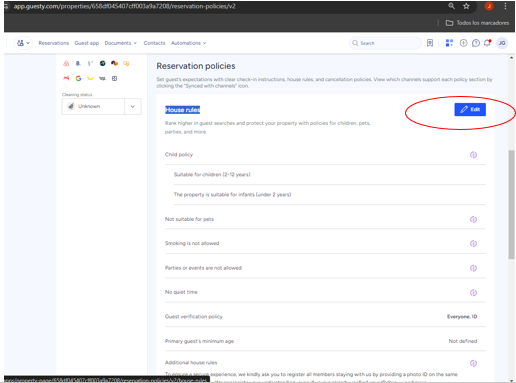
3.12.2. Take the information from the lower box and paste it into AIR.
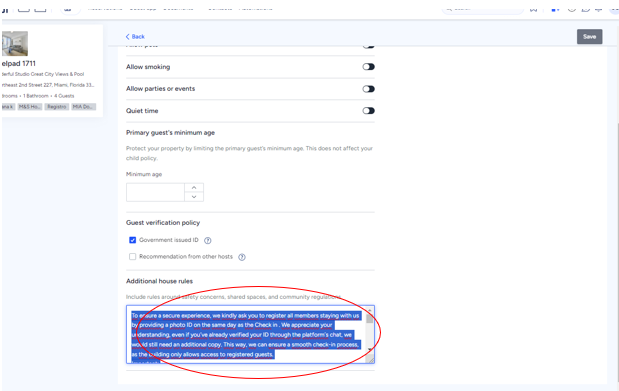
3.12.3. Save

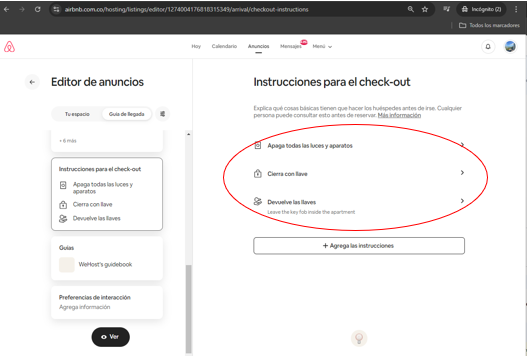
3.13. In AIR, select Check-out Instructions
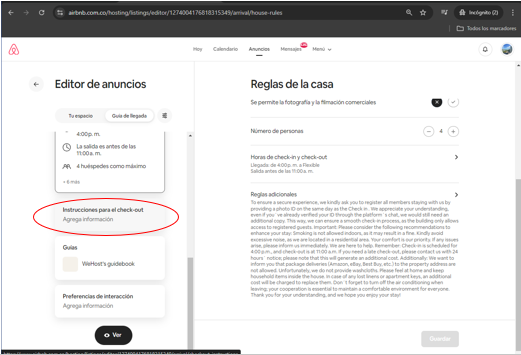
3.13.1. In AIR, select Check-out Instructions.
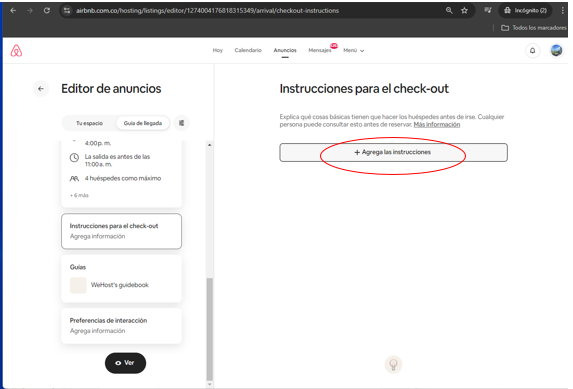
3.13.2. In AIR, select Check-out Instructions.
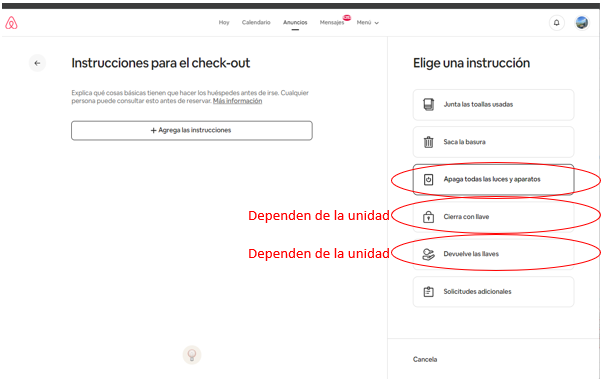

3.14. In AIR, select Check-out Instructions (Depends on the UNIT; it must be checked in Guesty)
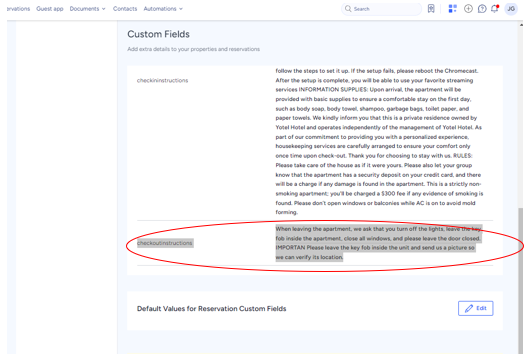
Details & Layout / Custom Fields.
3.14.1. Checkout/Instructions
3.14.2. The three ITEMS are continued to be applied in Airbnb, and the instructions are finalized.
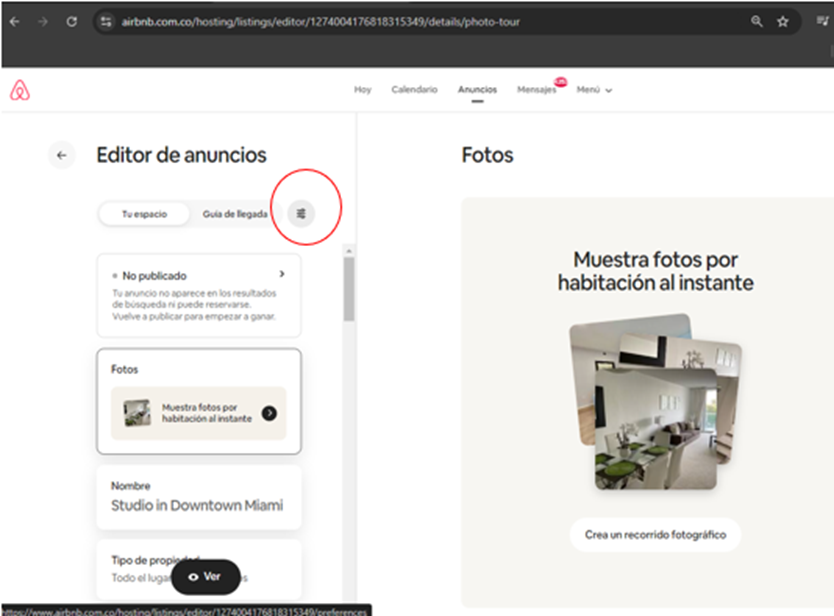
Procedure 4. EDITOR Process / Your Space
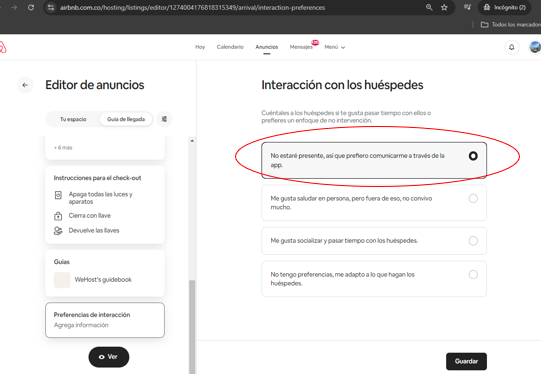
In Airbnb, select Interaction Preferences.
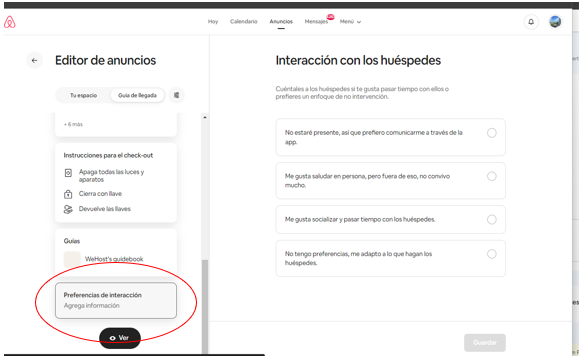
4.1. In Airbnb, select Interaction Preferences.
ALWAYS select: I won't be present, so I prefer to communicate through the app.
And finally, press SAVE.
4.2. Select: YOUR SPACE.

4.3. Select: YOUR SPACE / Name.
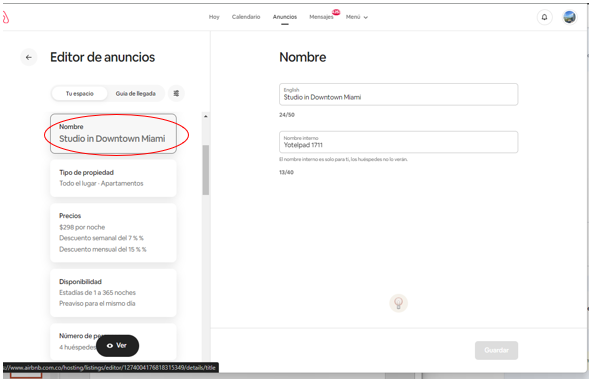
4.3.1. Select: The name of the space should highlight the characteristics of the unit.
Keep in mind that it is a maximum of 50 characters.

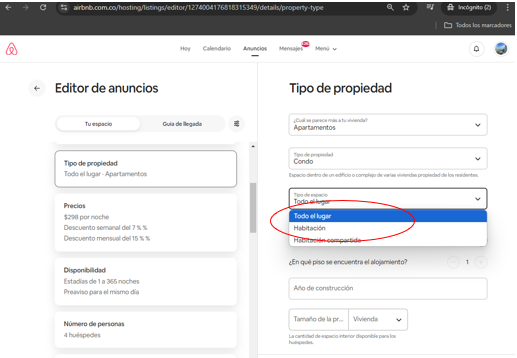
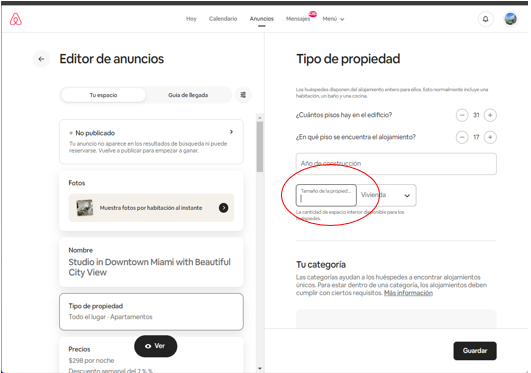
4.4. Property type.
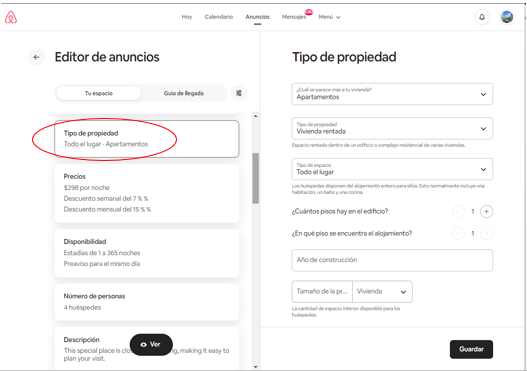
4.4.1. Property type: Validate selection.
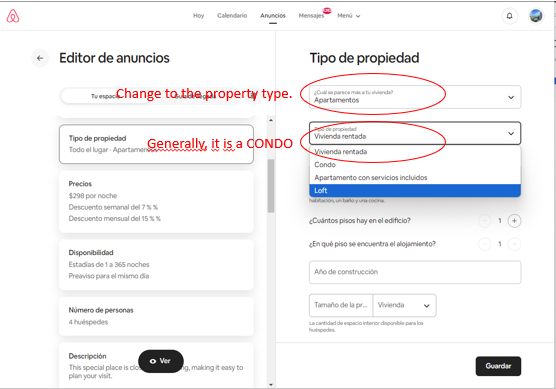
4.4.2. Property type / Space type: It is always THE WHOLE PLACE.
4.4.3. Property type.
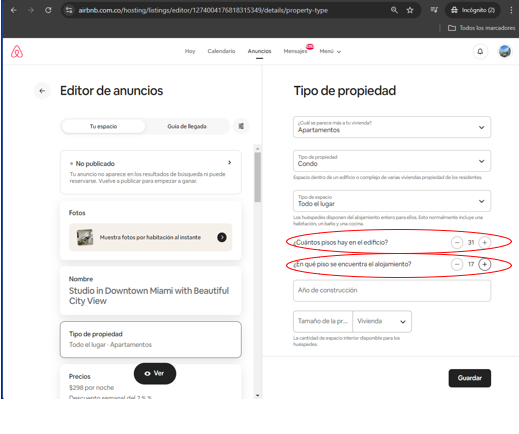
-How many floors does the building have? This item can be determined by researching the building or validating in the previous listing.
-On which floor is the accommodation located? This item can be extracted from the first numbers of the Unit; in this case, the number 17 corresponds to the 17th floor.
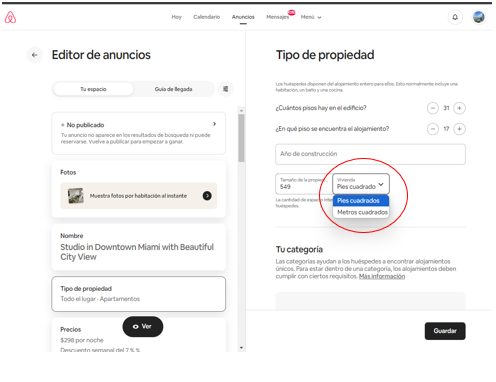
4.4.4. Property type / Property size.
This data is extracted from Guesty. Below is how to do it.
4,4,5, Details & Layout/ Location & details
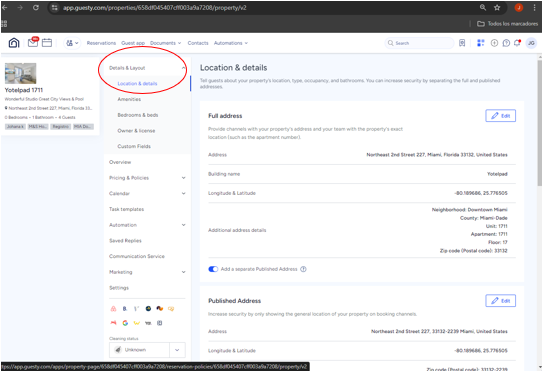
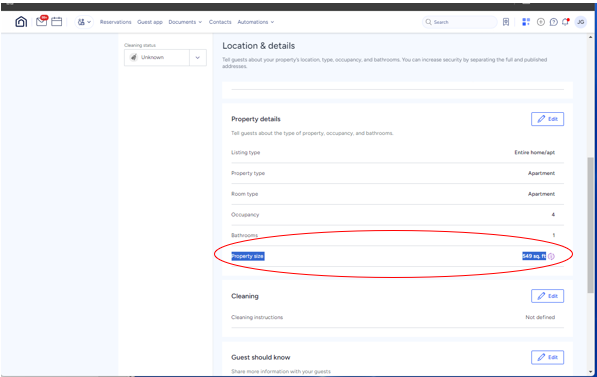
4,4,6, Property type/ Property size/ Property details
The size is extracted.
4,4,7, Enter the size in Airbnb and always mark it as square feet.
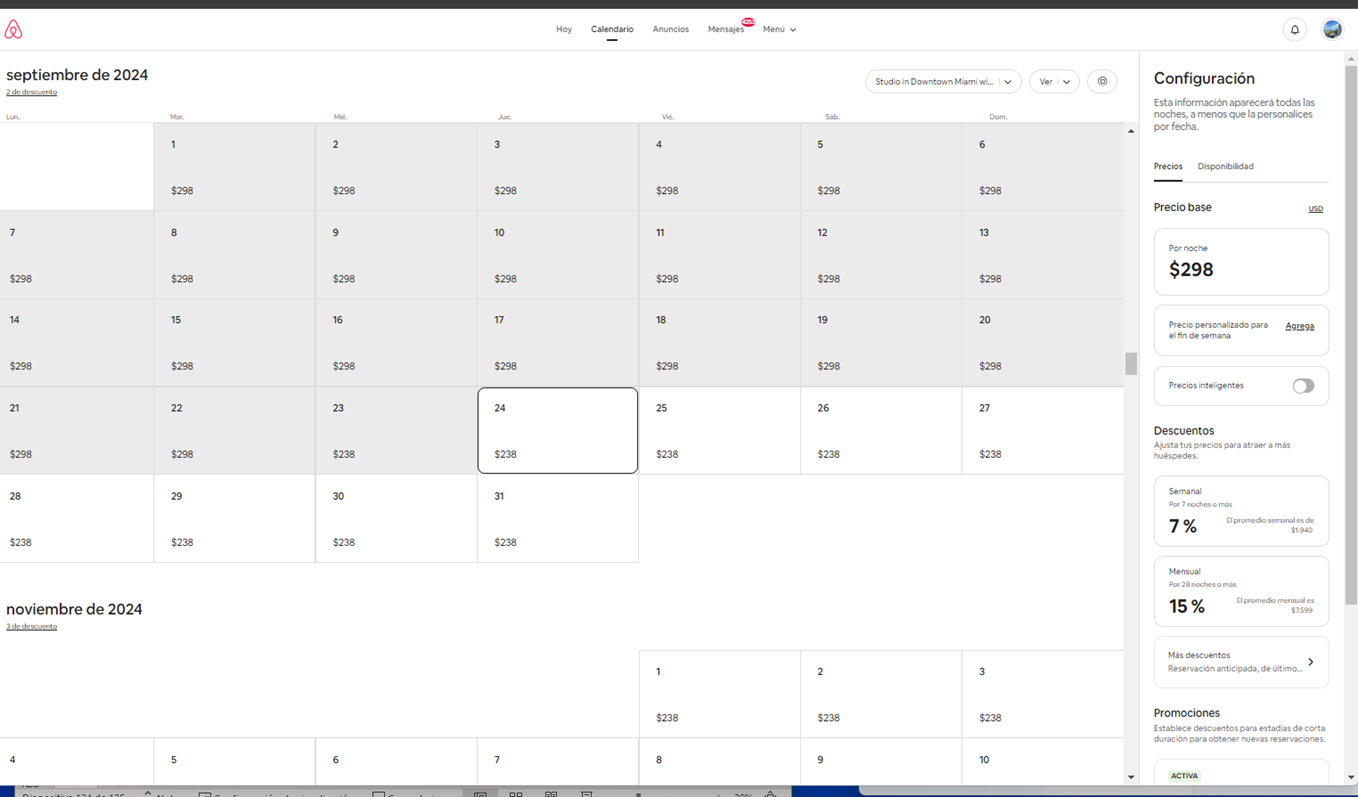
4,5, PRICES.
IMPORTANT: There are listings that do not require this item
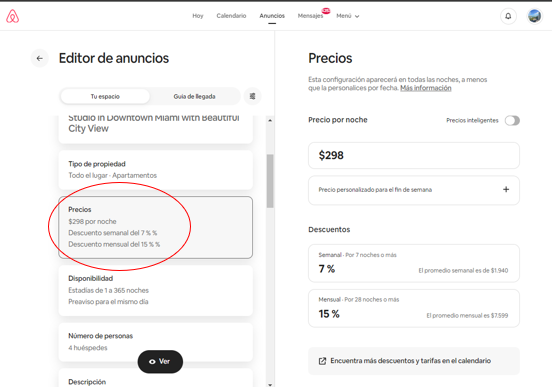
4,5,1, Take the info from Guesty
Pricing & Policies / Pricing

4,5,2, At this step, it should be noted that:
Price per night = Base Price
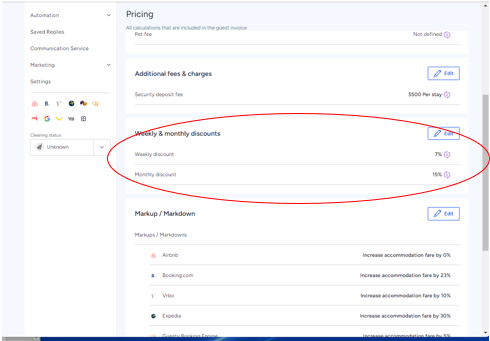
Additionally, the discounts are the same for all units, generally: Weekly (7%) & Monthly discounts (15%).
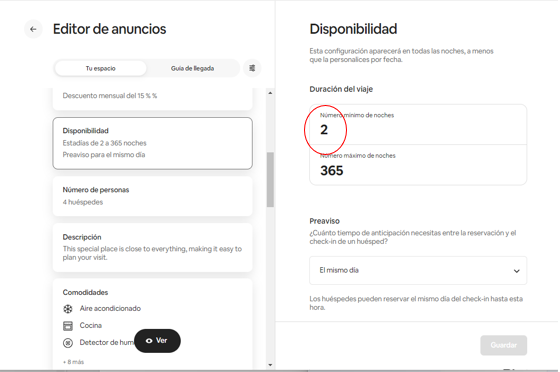
4,6. Availability. Set a minimum of 2 nights.
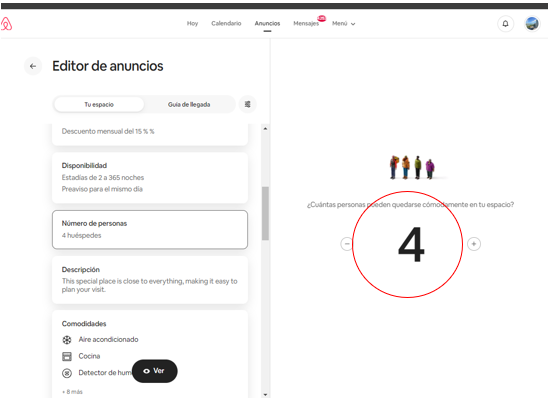
4,6,1. Number of guests:
Check the occupancy that was already filled in and enter the same amount.
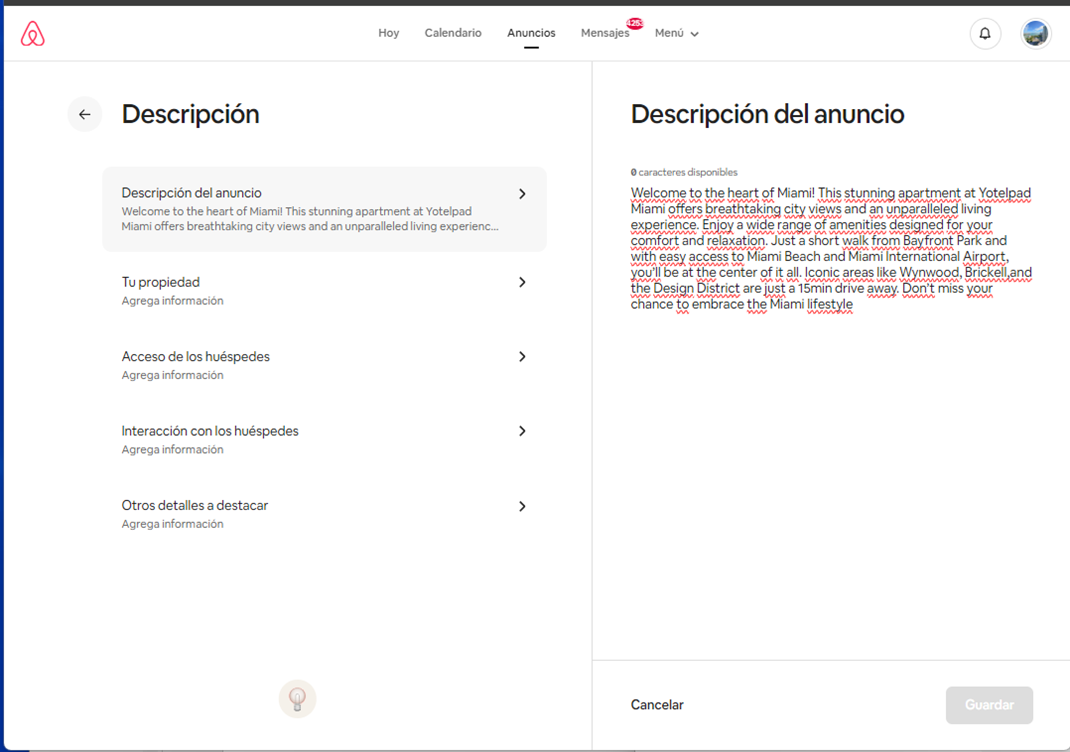
4,7. Description
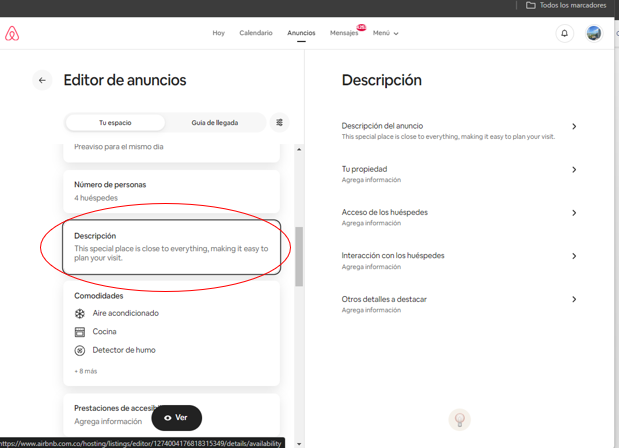
4,7,1. Here goes the main information for the listing.
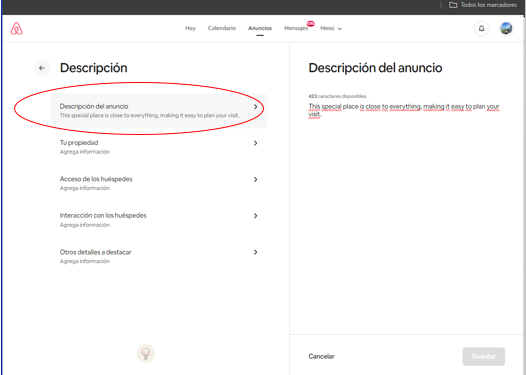
4,7,2. You can build the information based on the data from Guesty, as follows:
Marketing / Descriptions
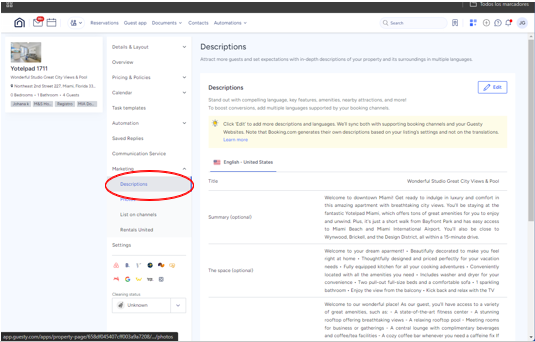
4,7,3. You can create the information based on the data from Guesty
Marketing / Descriptions
In this case, the goal is to build a similar text, and a good tool could be CHAT GPT. This way, you provide the data and ask it to create a listing of 500 characters.
IMPORTANT: The idea is that it should not be the same description as the one in Guesty, to avoid being flagged as duplicate content.
At the end, it's recommended to check the character count in Word, as sometimes the CHAT GPT tool does not adhere to this rule.
4,8. Your property. To create the listing, take the data from Guest/Descriptions/Edit.

4,8,1, Your propierty/ The Space
4,8,2, The space
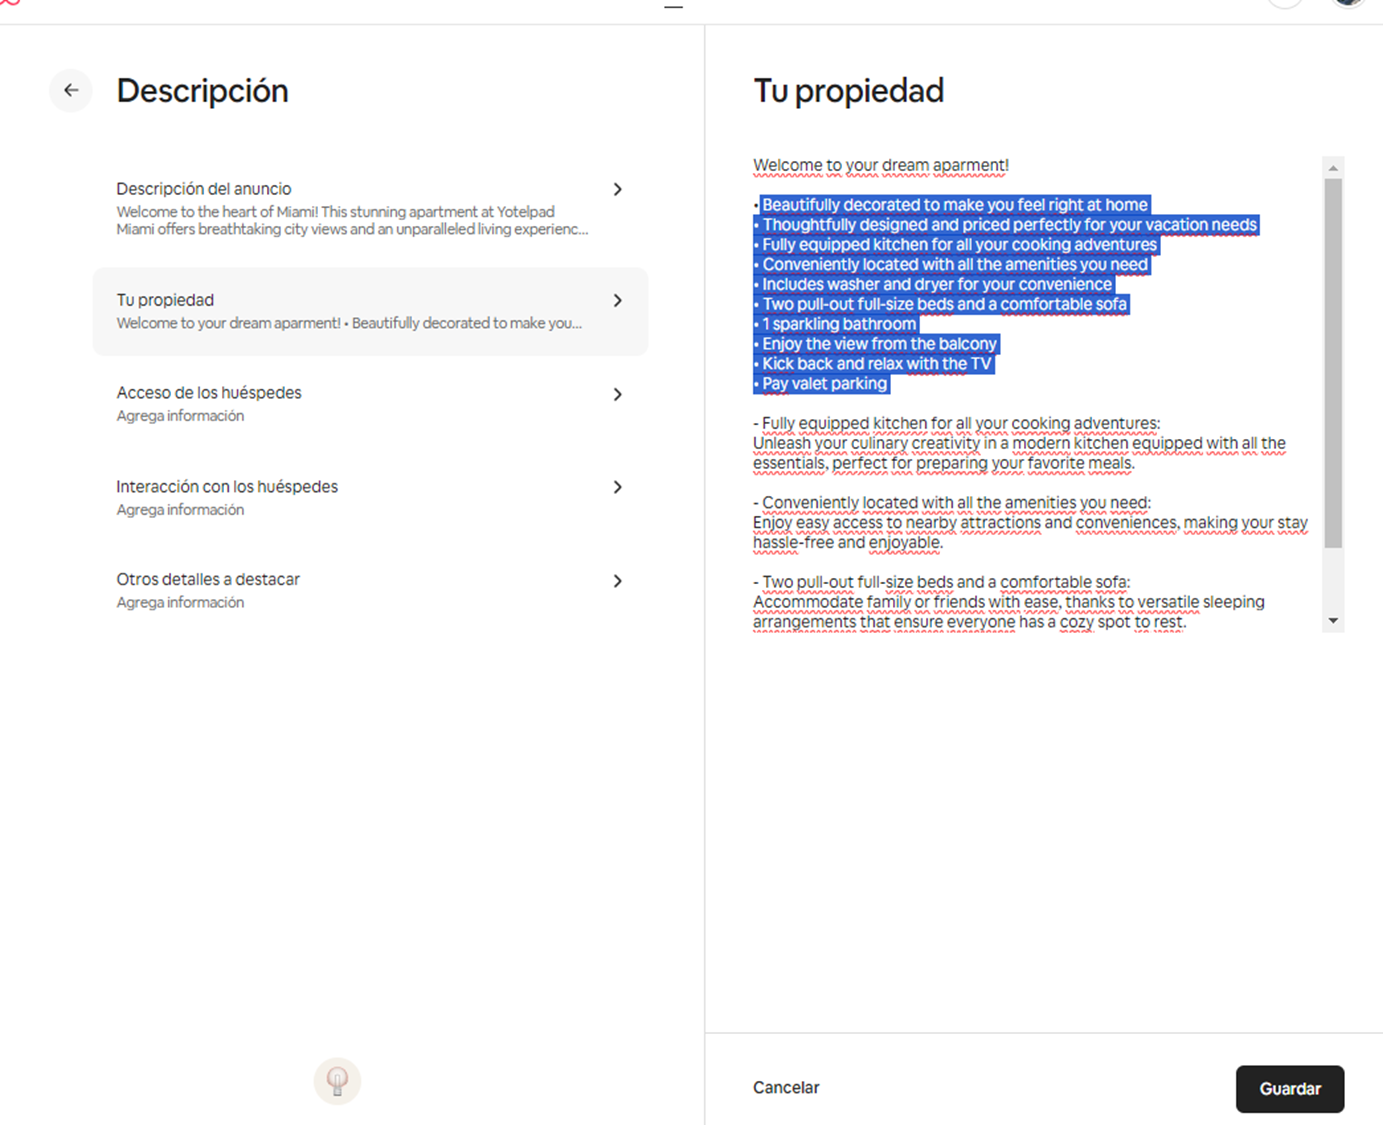
Provide the same information from Guest (if complete). Additionally, include the following:
- A list with the description of each space should be created using the CHATGPT tool, based on the information from Guesty.
IMPORTANT: The text must always include the following items:
- Kitchen
- Balcony (if available)
- Bedroom - bed
- Parking
- Living room
- Location
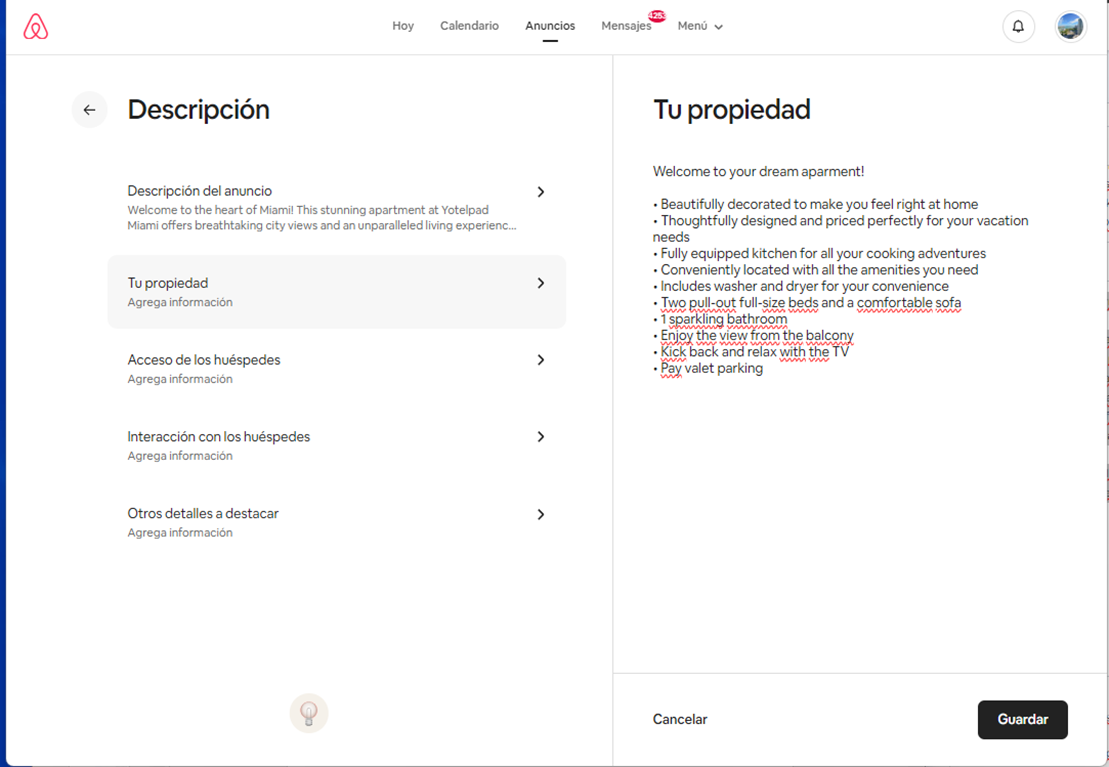
4,8,3, Your property. The space looks like this:
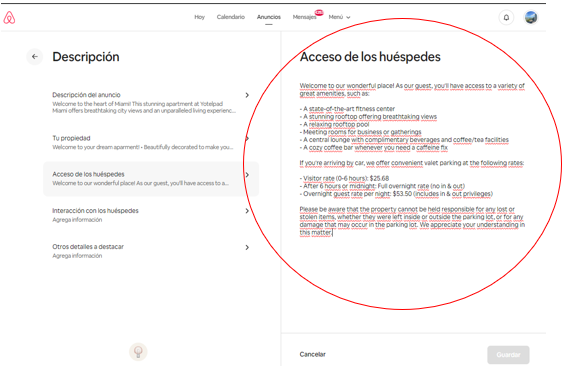
4.9, Guest Access. The information is taken from Guesty: Marketing / Descriptions / Edit.
4.9.1. Guest Access. Copy the information from Guest Access.
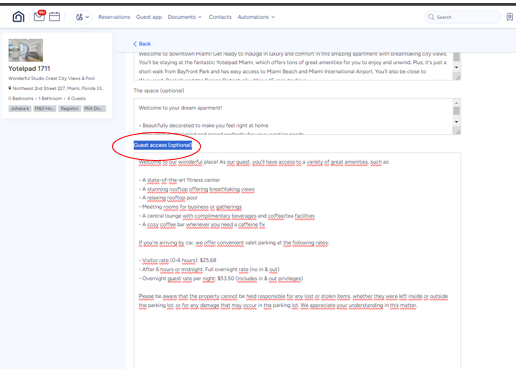
4, 9, 2, Guest Access / paste on Airbnb platform.
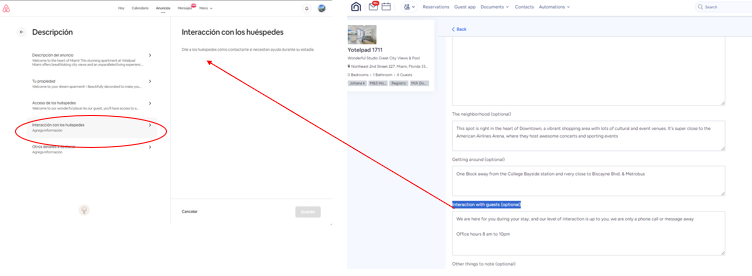
4.10. From the item 'Interaction with Guests', copy from Guesty: Marketing/Descriptions /Edit /Interaction with Guest.
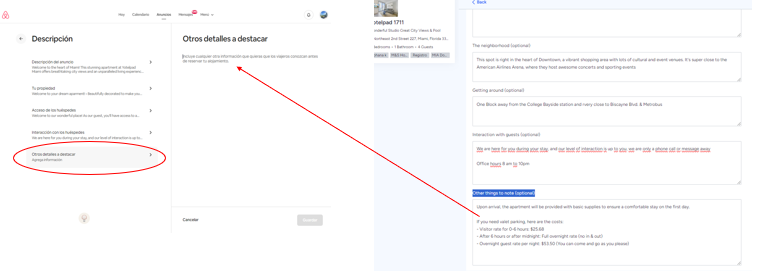
4.11. Other details to highlight.
Copy and paste from Guesty: Marketing/Descriptions /Edit /Other things.
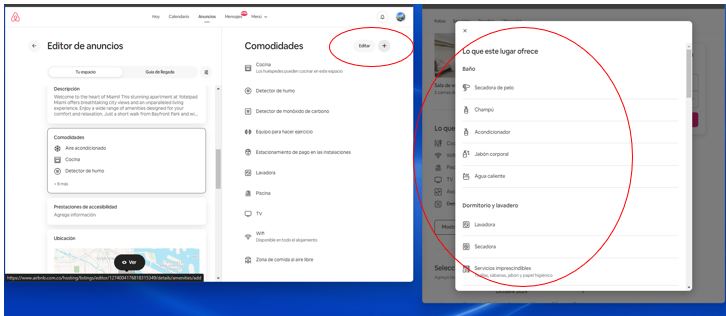
Procedure 5. Amenities.
The corresponding amenities for the unit should be added according to the information from Guesty.
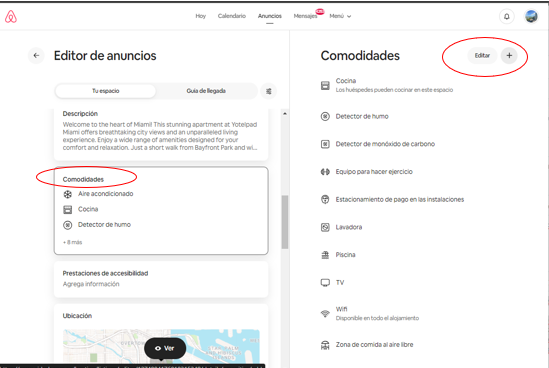
5.1. Or, if you have an already published listing, use it as a base to copy the same features. The path is as follows.
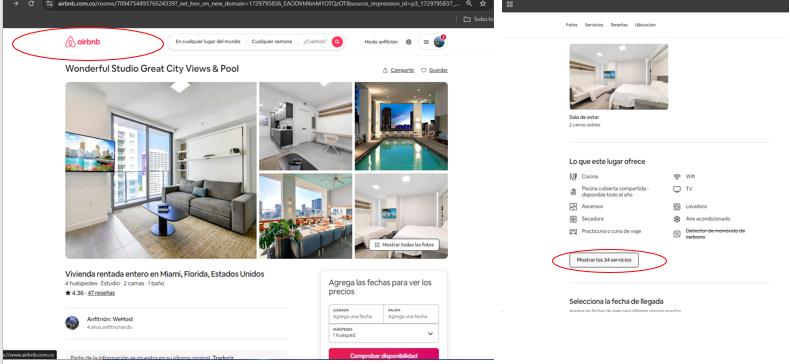
5.2. They are added one by one, using the existing listing as a base. Edit / and enter each item.
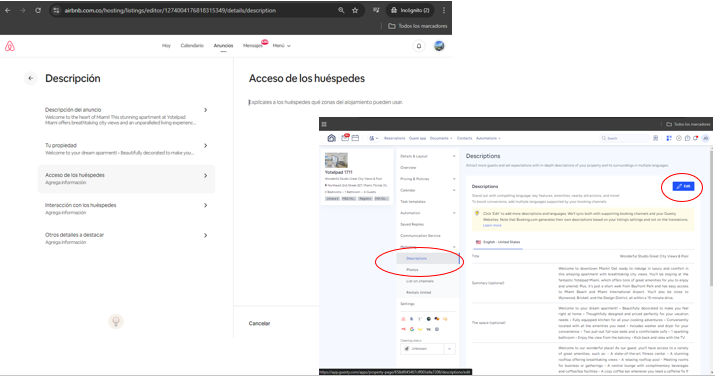
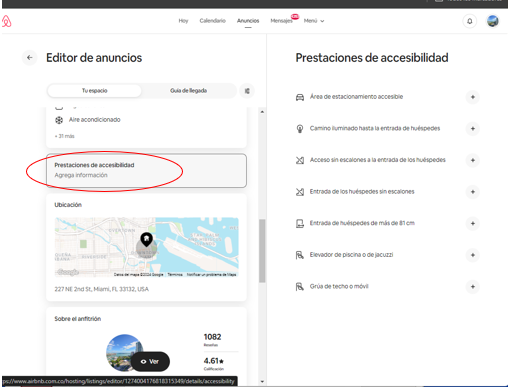
Procedure 6. Accessibility features
Nothing is to be added.
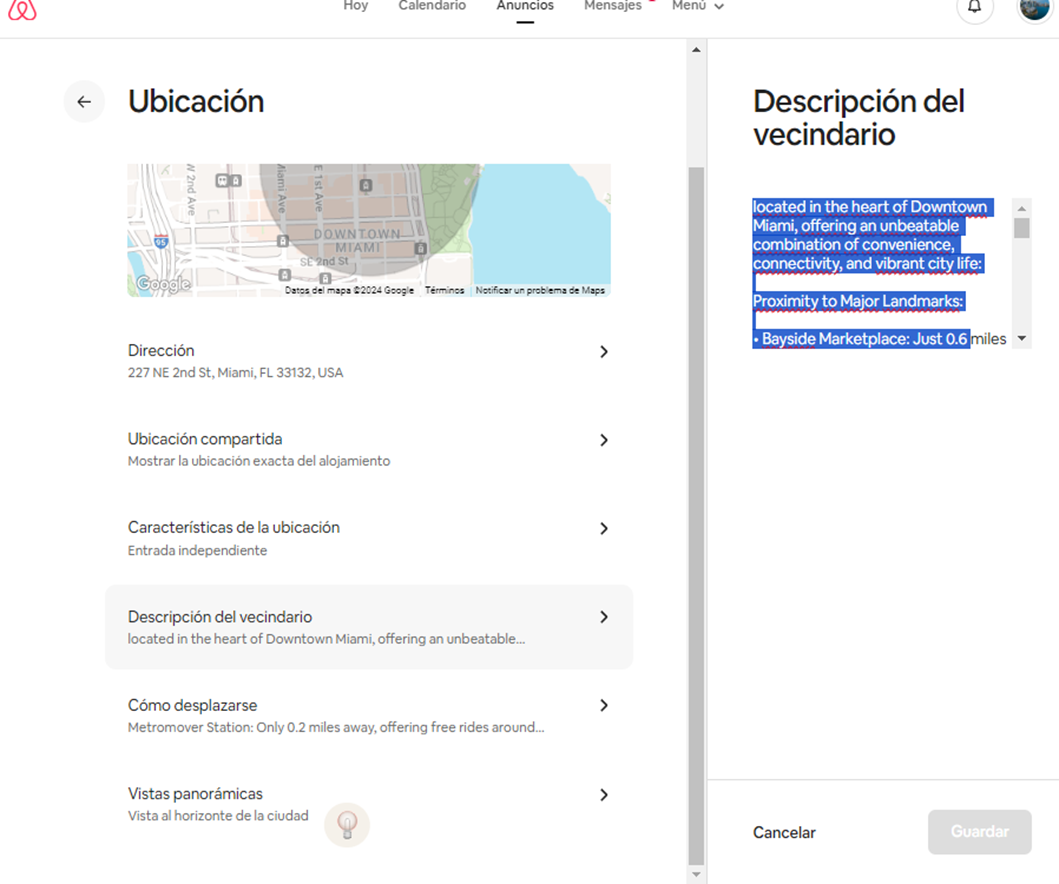
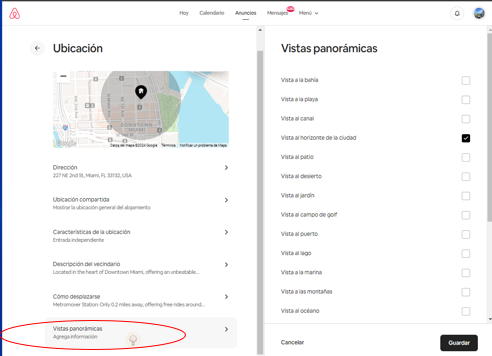
Procedure 7, Location

7.1. Neighborhood Description
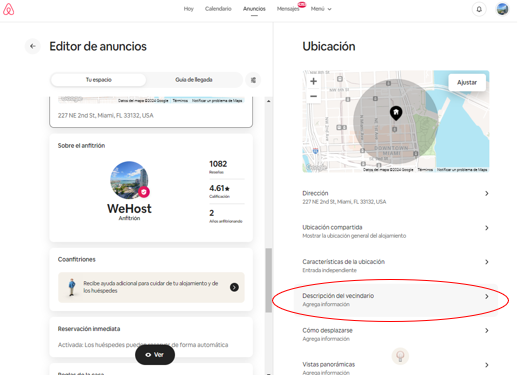
7.2. I search on Airbnb for listings in the same building. We go in through Location/Neighborhood Description.
Select all information (Ctrl+A) and paste into the new unit.
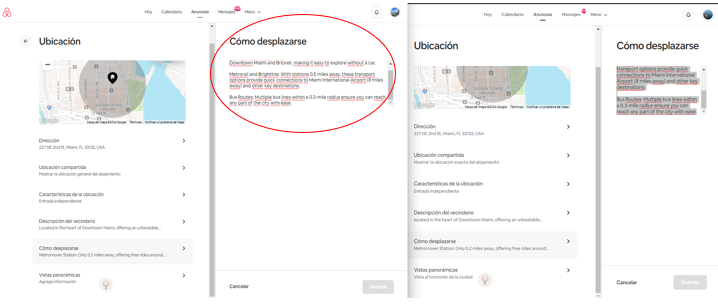
7.3, Getting Around: Modes of Transportation in the Area.

7.3.1, Getting Around: Modes of Transportation in the Area. Information is taken from the other Airbnb listing.
7.4, Panoramic Views. To fill in this information, you can consider the photos of the unit.
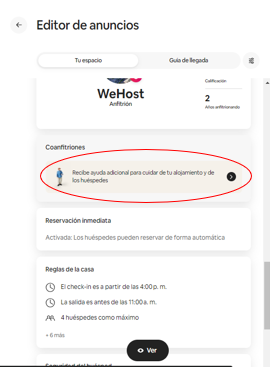
Procedure 8. Co-hosts.
At this point, invitations are sent to other profiles to share the traceability of the information.
8.1. Two profiles are always invited:

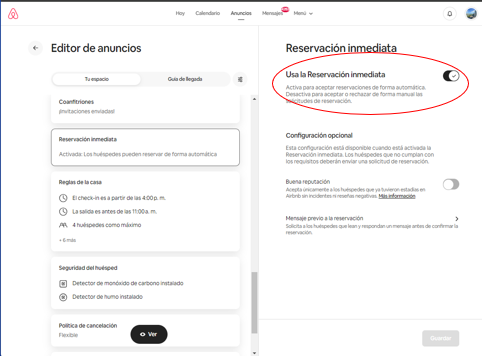
8.2. The item called 'Use Instant Booking' must always be active.
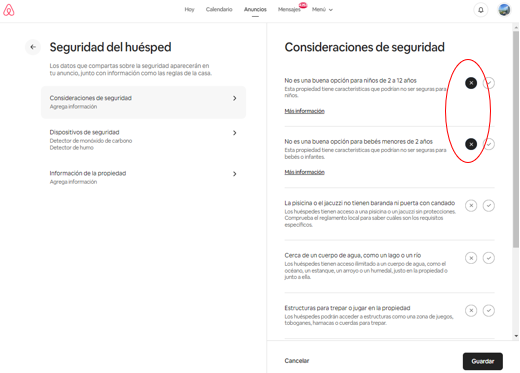
8.3, Guest Safety.
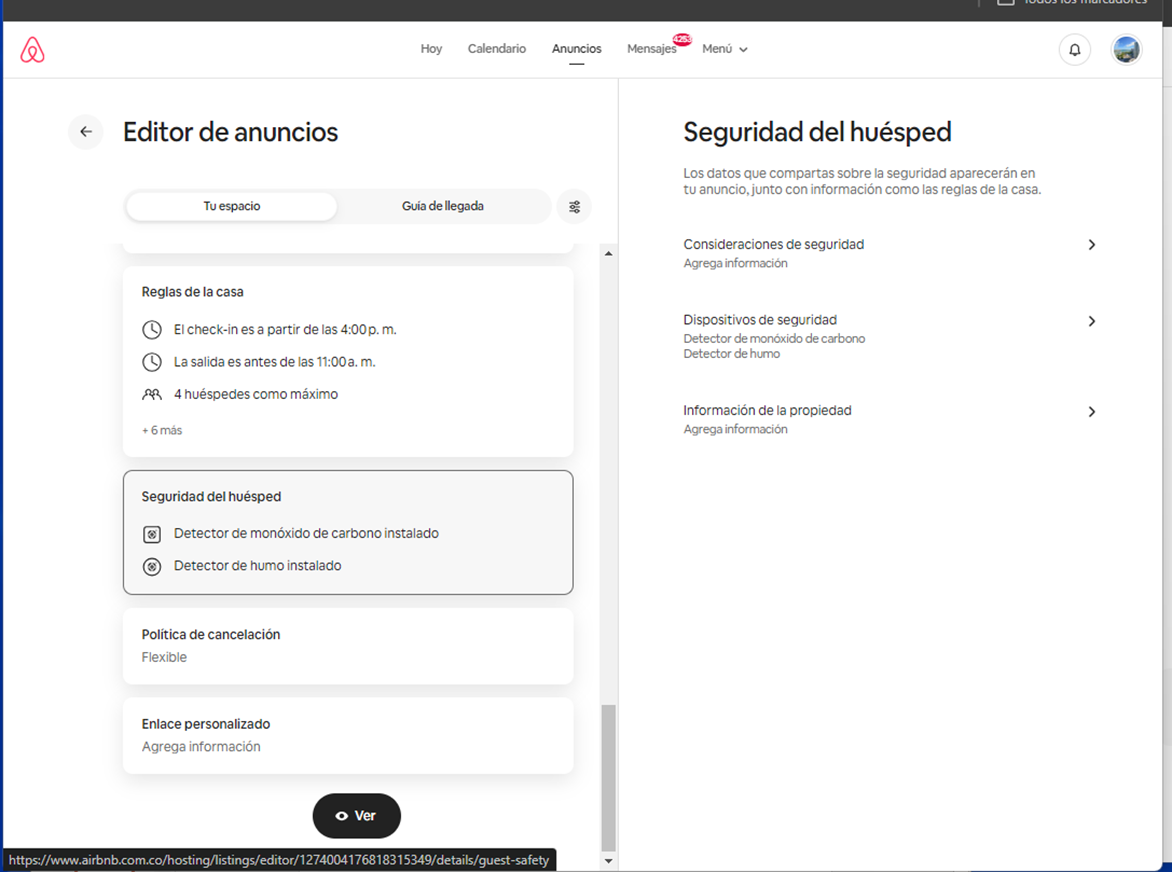
8.4. Guest Safety. Always check the first two options, as we accept children in the units.
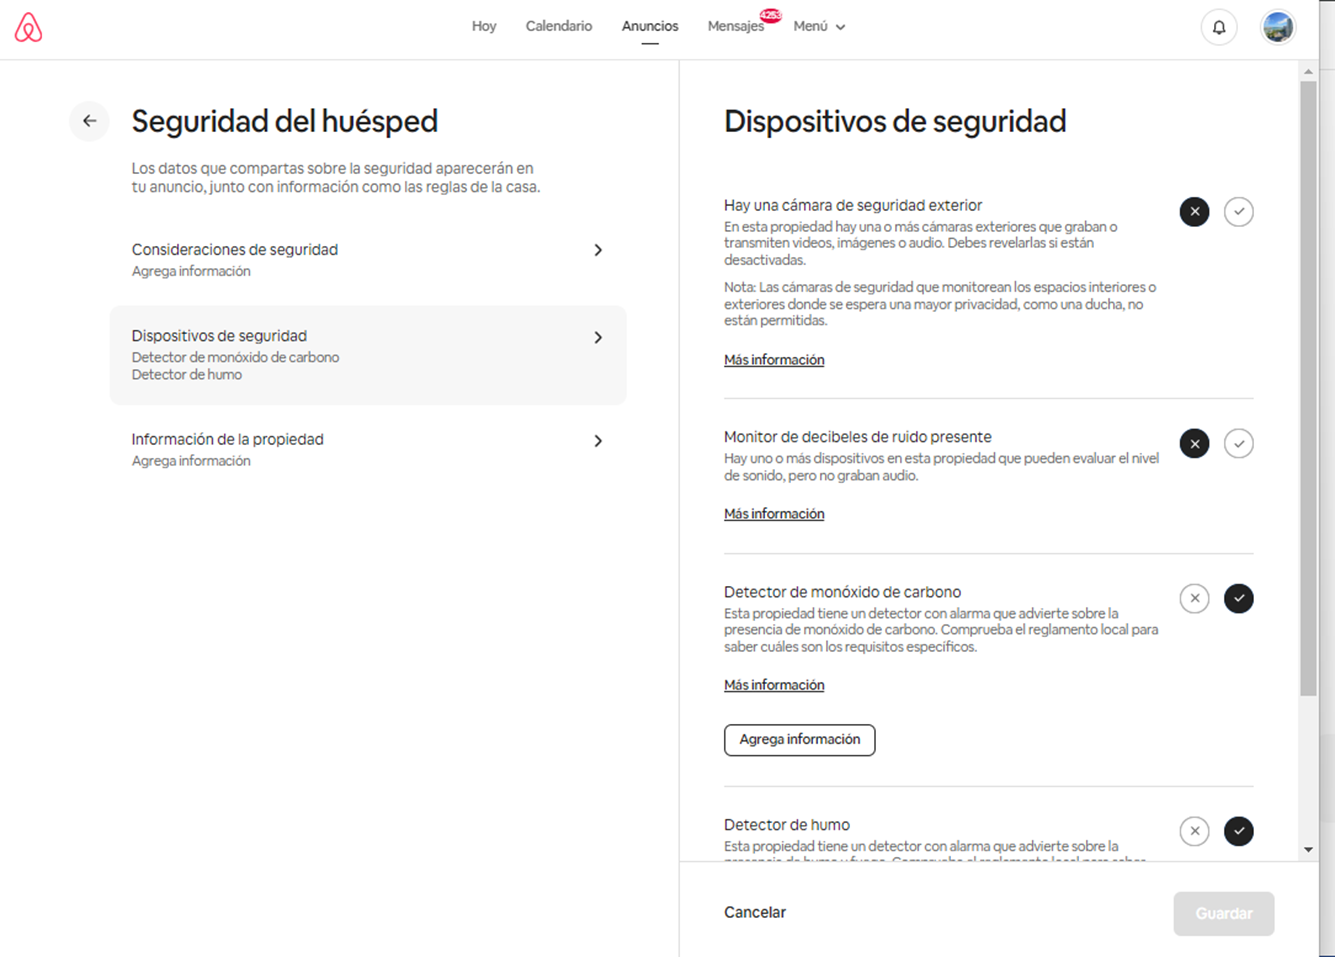
8.5, Item Security Devices: Keep in mind that all units have a Smoke Detector and a Carbon Monoxide Detector.
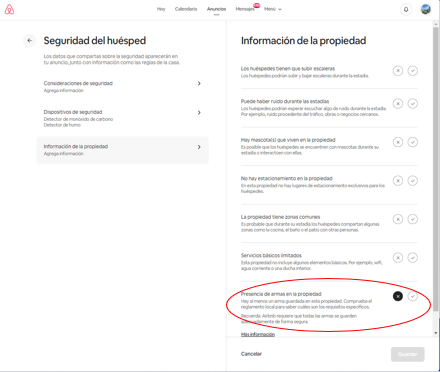
8.6. Property Information: It is reviewed with the features of each property, although generally, the presence of weapons on the property is never allowed.
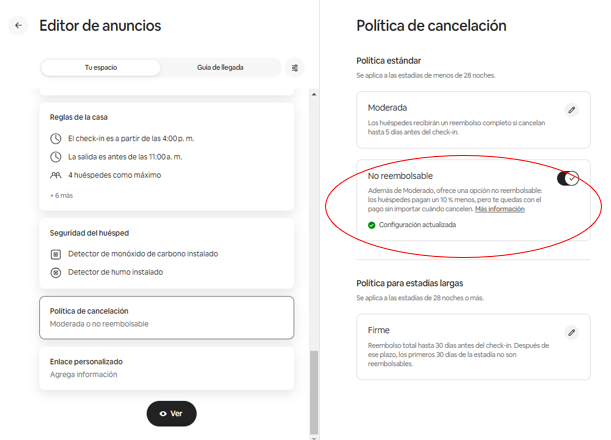
Procedure 9. Cancellation Policies.
Select MODERATE.
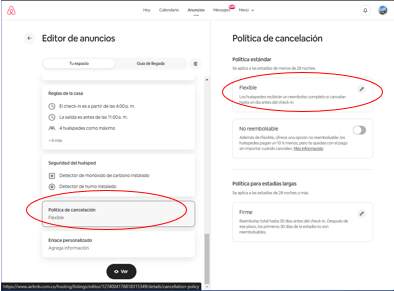
9.1. It should always be marked as 'Non-refundable'
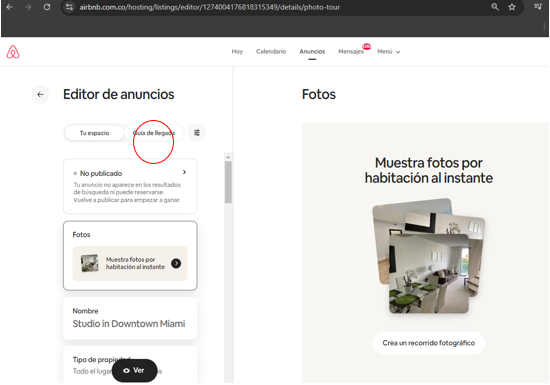
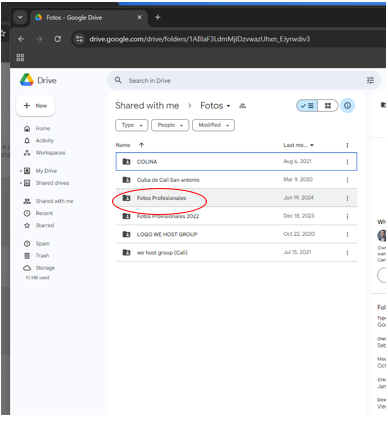
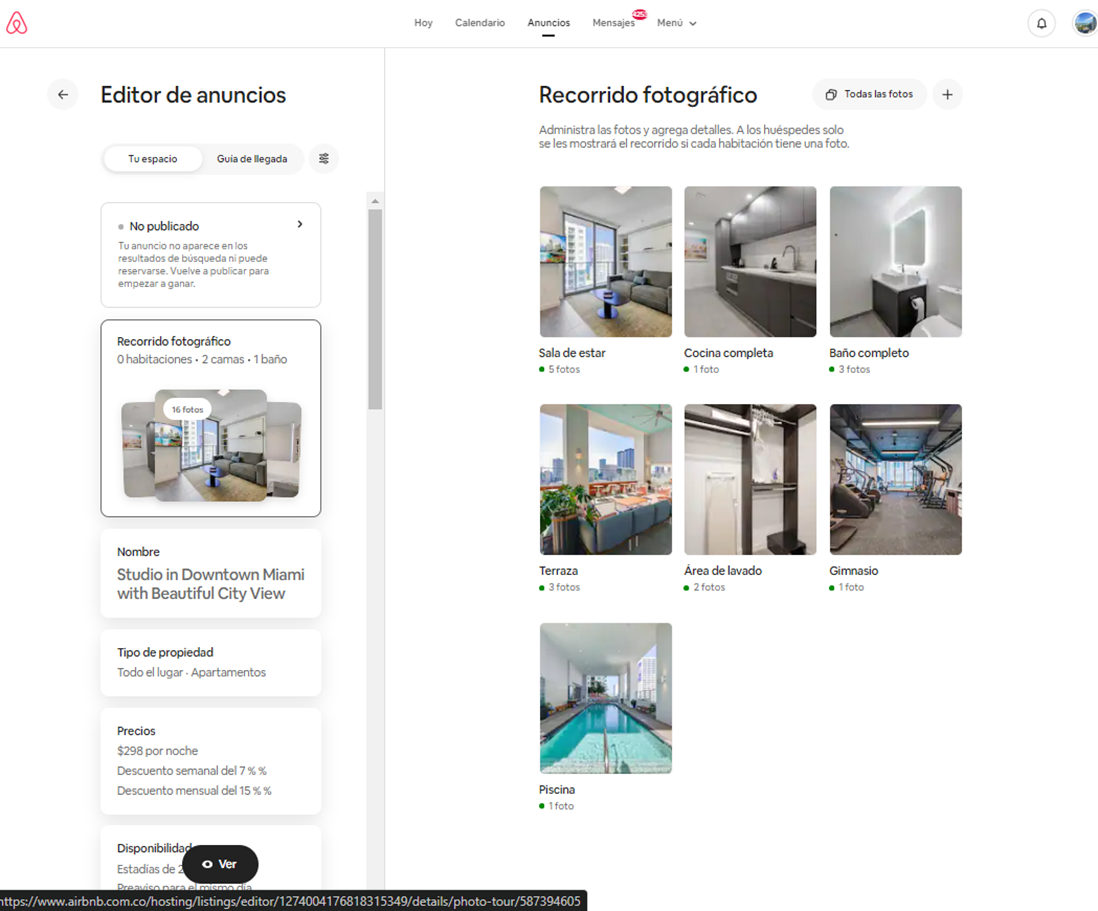
Procedure 10. Photos.
It is important to mention at this step that the area works with pre-uploaded photos, which can be found in the shared Drive:
https://drive.google.com/drive/folders/1cWRuBGjW8HrM-6t8QB_dEQr-YFf0oq9Q
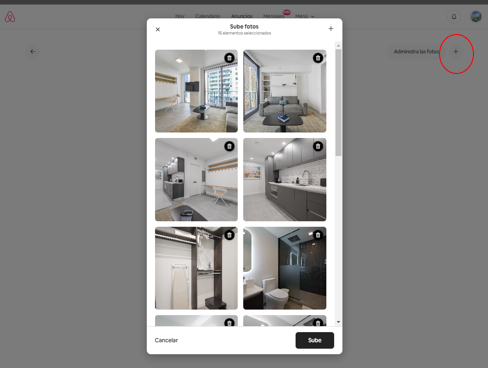
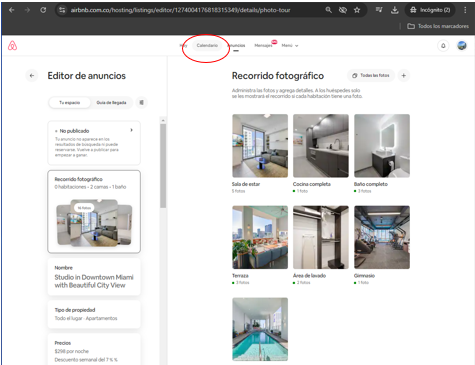
10.1, After downloading the photos to upload them to the platform, go to the second path: AIRbnb / Photo Tour / All Photos.
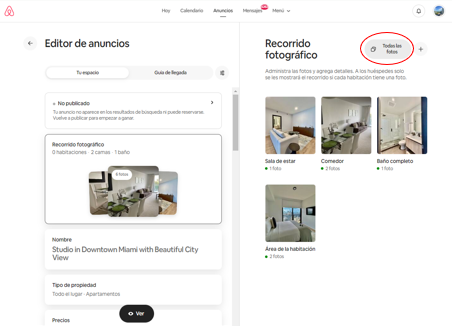
10.2, Manage the Photos.
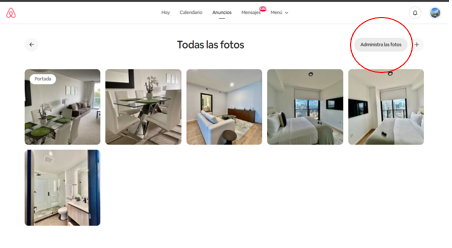
10.2.1, Add the photos to the panel. IMPORTANT: All photos are edited at https://pixlr.com/en/batch/
Features to consider:
- Bring the images to life with brightness and opacity.
- For images that have televisions, use the images that are already edited.
10.2.2. The best photos should be placed in the top 5 spots.
IMPORTANT: Place all photos in a specific área
Manage Photos / select groups of images and assign a space:
- Living Room
- Dining Room
- Bathroom
- (…)

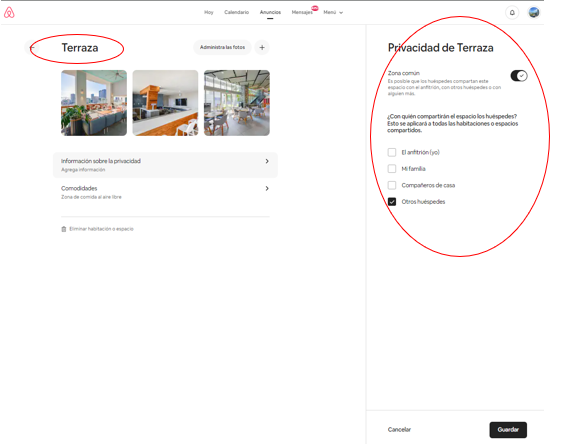
10.3. We select each space to organize the amenities for each one.
10.3.1. Information is extracted from Guesty. Example: Beds.
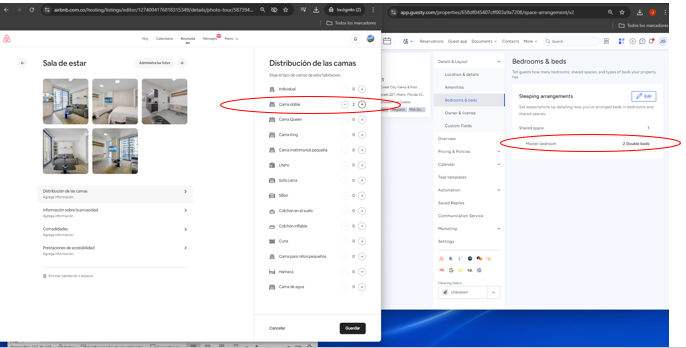
10.3.2. With the two items below, the information is filled in based on Guesty or the previously uploaded listing on the platform. - Beds - Amenities
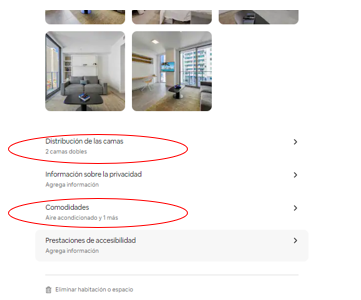
10.3.3. In areas like the terrace, it should be listed under PRIVACY: COMMON AREA. Keep this in mind for other spaces that are for communal use.
En este punto, se termina la Inscripción de la propiedad, con sus detalles y lista para publicar.
El siguiente paso es trabajar sobre el CALENDARIO.
Procedure 11, CALENDAR.
15.1, Search for the Unit.
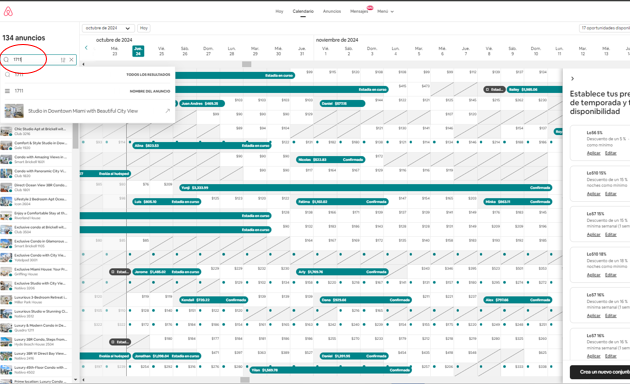

15.3. We enter the unit and will close the calendar (this is done so that when it syncs with Guesty, it remains blocked). It should stay that way for a maximum of 1 day. After that, it will be unlocked according to the synchronization with Guesty.
Workflow Map
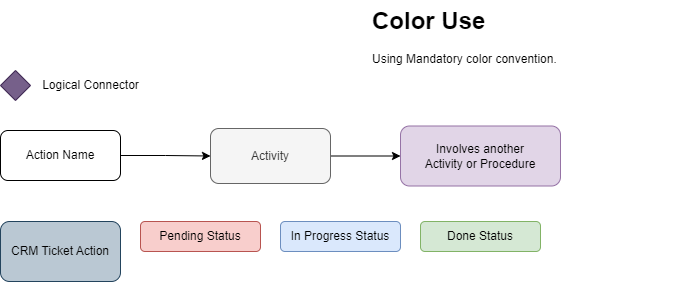
Procedure Line
- Procedure 1.
- Procedure 2.
Information
Sugest
Important action o information
Mandatory action / information